Yes! Vexing electrical issue resolved.
Posted by Ferdinand
|
August 24, 2011 12:17PM
|
|
|
Registered: 15 years ago
Posts: 797 : Ottawa |
I've had a really annoying issue with my tail lights for over a year now. The overhead check panel randomly comes up with a warning telling me that one of my tail lights is burned out, except it's not. There doesn't seem to be any reason for it. The lights are working fine.
It's not even like going over a bump sets it off. I can be sitting idling at a stop and suddenly the check light comes on in my instrument cluster and the overhead check panel shows a "REAR LIGHTS" warning. It doesn't do it every day. Sometimes a whole week goes by and I think it's cured itself, but then it starts doing it again. Grrrrrrrr. I've tried replacing the tail light bulbs, no difference. I've taken the tail light clusters all apart, cleaned up all the contacts, no difference. I even uninstalled and opened up the check relay box (mounted under the radio antenna). There's nothing wrong with it. It works perfectly. I studied the wiring diagram. Power to either tail light bulb flows through the check relay closing two relay switches (one for each tail light bulb). As long as both tail light bulbs filaments provide a path to ground, then both relay switches remain closed. When either or both bulbs burn out, then one or both of those relay switches open interrupting the ground path from the fault indicator, which triggers the warning light in the overhead check panel. 
Studying that diagram again yesterday I finally had a clue! That ground connection to the fault indicator on the overhead check panel is via Pin-13 of the 26-pin connector (two rows of 13 pins). That means it's one of the outermost corner pins. If those large connectors aren't pushed on or pulled off straight, it's the end pins that see the highest bending stresses. Gee, I wonder... So, it was time to have a closer look at the check panel itself. 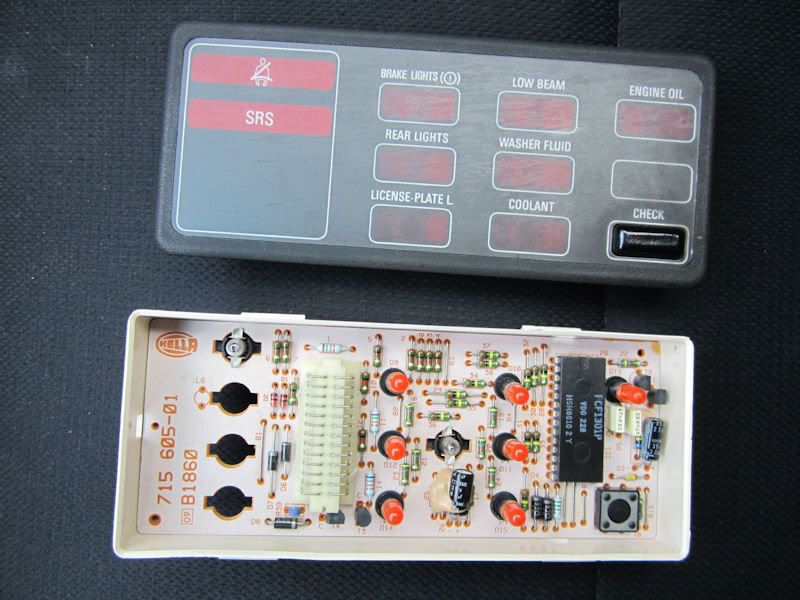
With the box opened up, the circuit board can be lifted out. Flipped over, it looks like this. Pin-13 is at the bottom-left corner of the socket for the 26-pin connector visible here. 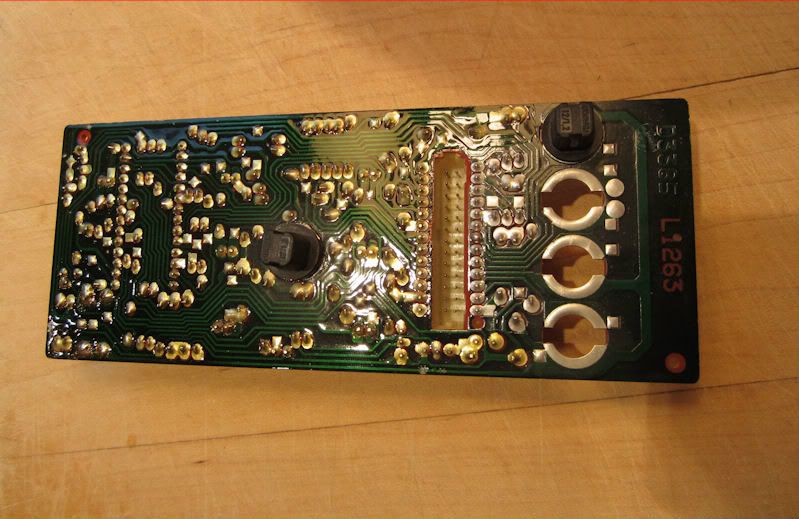
Check it out! There's the problem right there. The solder joint has a hairline crack around that pin. Eureka!!! Whipped out the soldering-iron, reflowed that solder joint, and hallelujiah, I think it's fixed! The warning light stayed off the whole time during the drive to work this morning. Of course this might just be one of those weeks where it has mysteriously and temporarily fixed itself... 
|
|
August 24, 2011 12:41PM
|
|
|
Registered: 15 years ago
Posts: 797 : Ottawa |
Furthermore, while I was in there, I fixed a second problem with the overhead check panel.
The other day while I was driving along, suddenly the check light started flashing again in my instrument cluster. I suspected the usual recurring false alarm about the tail lights, so I reached up to the overhead check panel to see which warning LED is lit and to push the "CHECK" button to cancel the annoying flashing light in the instrument cluster. Except, how bizarre, none of the LEDs are lit in the display!? Huh? That's not right. When I pushed the "CHECK" button, all of the LEDs lit up, as they should with that test function, except the LED for the ENGINE OIL warning which stayed dark. Oh-oh. Sure enough, I checked the dipstick and the engine oil level is down to the halfway mark, which normally triggers the ENGINE OIL level warning light in the overhead check panel. But now it seems the LED for that warning light has died. That sucks, since it's actually one of the more useful warning lights. So, while I had the check panel circuit board out for inspection anyway, I had a closer look at the pins for that LED and discovered another bad solder joint. What the heck would cause this to happen? That pin is just sitting loose in a hole?? 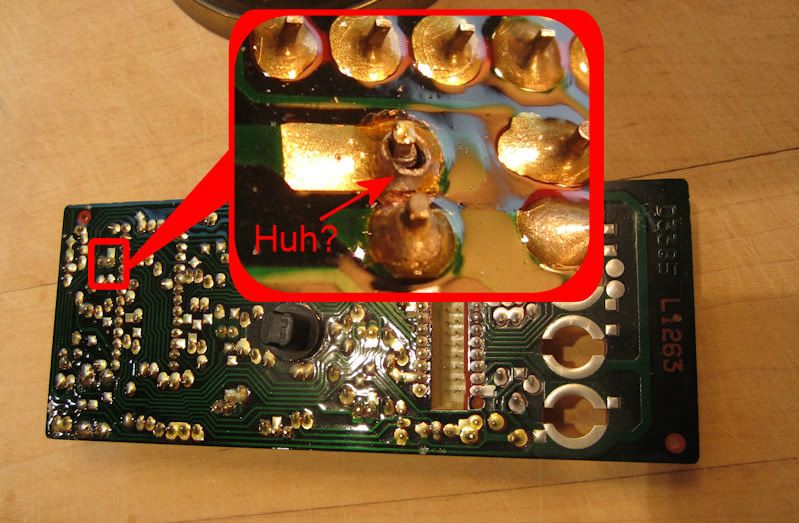
With the LED pins soldered back into place, the warning light works dandy fine now, good to go for another 500,000km. 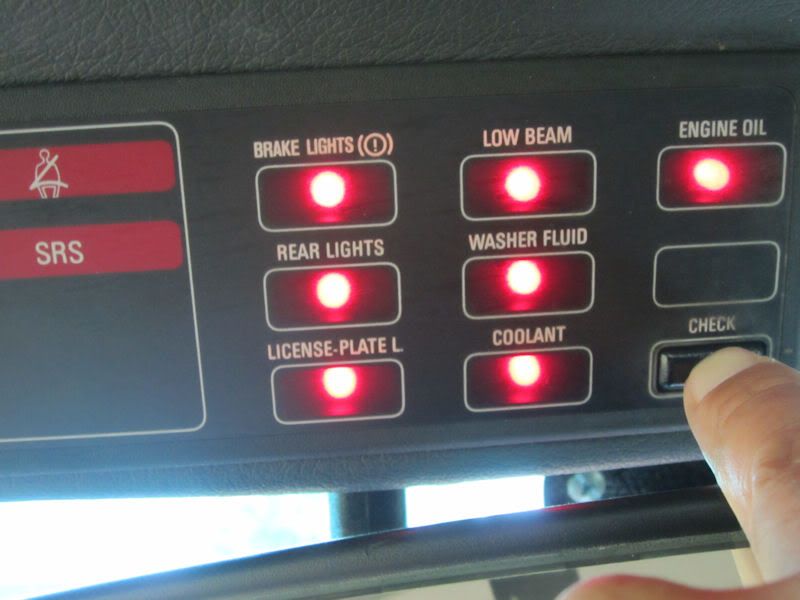
|
|
August 24, 2011 06:26PM
|
|
|
Registered: 15 years ago
Posts: 1,869 : Amagansett, New York |
First of all Ferdinand, you are truly a man after my own heart; you seem to get to the bottom of things. Especially these weird electrical nightmares that tend to plague these/our fine cars 
Around the early 80's we where making ecu's and remapping these tender solid state units for cars we were bringing into the country. Basically we were trying to get high-power upper end cars to pass tests to federalize them. We also brought the cars up to spec with glass, door beams etc. Those early computers were always going wrong; bad solder joints, under built over stressed pieces of solid state. It seemed one step forward, two back, back then!  way to go commander way to go commander
|
|
August 26, 2011 04:12PM
|
|
|
Registered: 14 years ago
Posts: 799 : O Porto |
|
August 26, 2011 07:55PM
|
|
|
Registered: 15 years ago
Posts: 1,538 |
I can't believe that it has taken all these years for someone to finally nail down the mysterious working/not working brake lights thing!
You have single handedly handed every E30 owner what is probably the real solution to this recurring nightmare! Being doggedly stubborn or at least sticking to the problem like crazy glue; you have finally tracked down an annoying issue that has plagued most E30 owners since the cars first aged a little 
Thanks for never letting this one go |
|
August 27, 2011 12:21PM
|
|
|
Registered: 15 years ago
Posts: 797 : Ottawa |
All along I was convinced there was something wrong inside the tail light assembly. It was really starting to bug me that I couldn't find what was causing the problem.
I only thought of looking inside the Overhead Check Panel itself when the unrelated problem of the failed Oil Warning LED popped up. I still don't understand what caused that other solder joint to fail. The LEDs never move. And, other than the frequent false tail light warning, the oil level LED lights up so rarely that I can't imagine how it would ever overheat the solder connection. Bizarre, eh. But, with the connections properly re-soldered, both issues truly seem to be fixed now. I'm so tickled about that, I feel like doing a BMW banana dance! 
|
|
August 27, 2011 03:45PM
|
|
|
Registered: 15 years ago
Posts: 1,538 |
|
August 27, 2011 07:26PM
|
|
|
Admin
Registered: 15 years ago
Posts: 944 : Lake Havasu City, Arizona |
|
August 28, 2011 02:27AM
|
|
|
Registered: 15 years ago
Posts: 670 |
|
August 28, 2011 04:18PM
|
|
|
Admin
Registered: 15 years ago
Posts: 944 : Lake Havasu City, Arizona |
|
August 28, 2011 05:50PM
|
|
|
Registered: 14 years ago
Posts: 799 : O Porto |
The old electronic boards are very likely to develop problems of that kind, due to bad or cracked solders, that become annoying because the circuit fails intermittently. Fortunately newer surface mount boards and fewer discrete components made new cars a lot more reliable, but nearly impossible to repair with basic home equipment.
Well done Ferdinand! 
|
|
August 28, 2011 06:43PM
|
|
|
Registered: 15 years ago
Posts: 797 : Ottawa |
The check panel box just pulls straight out of the console. You see the two raised bumps along the top edge of the white box in this image? There are two more along the bottom edge as well. Those are all that holds the box into the console above the mirror.
Unplug the 26-pin electrical connector plug from the back of the box. If you look closely at the wiring plug you'll see that the #1, #13, #14, and #26 pins are numbered right on the plug. The black lid separates from the white box so you can see inside. The circuit board sits in the bottom of the white box and is held in place by only three raised bumps on the inside walls of the white box. In the picture, look at the left edge of the circuit board where there is the number "605-01". Just above the "5" is a hole in the circuit board. And just next to that is a small bright white rectangle on the inside wall of the white box. That's a little wedge that holds down that edge of the circuit board. There are two more little wedges like that, on either side adjacent to the black integrated circuit chip. Pushing on the pins of the electrical connector from the backside of the box pops the circuit board out. |
|
August 28, 2011 08:00PM
|
|
|
Admin
Registered: 15 years ago
Posts: 944 : Lake Havasu City, Arizona |
|
August 29, 2011 08:18AM
|
|
|
Admin
Registered: 15 years ago
Posts: 584 : Vermont, USA |
|
August 29, 2011 08:39PM
|
|
|
Admin
Registered: 15 years ago
Posts: 944 : Lake Havasu City, Arizona |
got the box loose but could not easily remover the connector. It appeared to be held on with some plastic tabs under the lead in wire bundle. Tried to get it off but was concerned about breaking it. A small metal spring clip fell out from somewhere and could not see a place to put it back. Hope the box stays installed now.
Replaced my oil sensor with one that checked out good and the one I removed checked bad but the light is still on. Uff Da. Bob in Lake Havasu |
|
August 30, 2011 09:16AM
|
|
|
Registered: 15 years ago
Posts: 670 |
|
August 30, 2011 10:34AM
|
|
|
Registered: 15 years ago
Posts: 797 : Ottawa |
I used a couple of small flat-bladed screwdrivers to ease the tabs back while pulling the plug out. No metal spring clips in mine. Photo? The oil level sensor circuit looks like this. Note that there are two switches. On my car the low oil level warning light comes on when the oil level shown on the dipstick falls below approx halfway between the marks. 
|
|
August 30, 2011 10:53AM
|
|
|
Registered: 15 years ago
Posts: 797 : Ottawa |
Just to be clear on this, my problem was with the tail lights not the brake lights. But the theory is similar for both. Bob I'm sure you already know this, but just in case, the brake light warning comes on automatically every time you start the car and should switch off the first time you depress the brake pedal. After that, it should only come on or stay on if a brake light bulb is burned out. That said, if the brake light warning is coming on randomly while driving and you know there's no problem with any of the bulbs, then yes you might well be having a similar issue as me with the cracked solder joints. Here is the circuit for the stop lights. Note that there is a third relay switch, located inside the centre high-mounted stop light in your back window. That one, as well as the two relay switches in the check relay, all have to close in order for the brake light fault indicator to see a path to ground confirming that all three bulbs are good. The connections at each point, and the contacts on the relay switches, all have to be good, as well as the solder joint at Pin-24 of the overhead check panel. 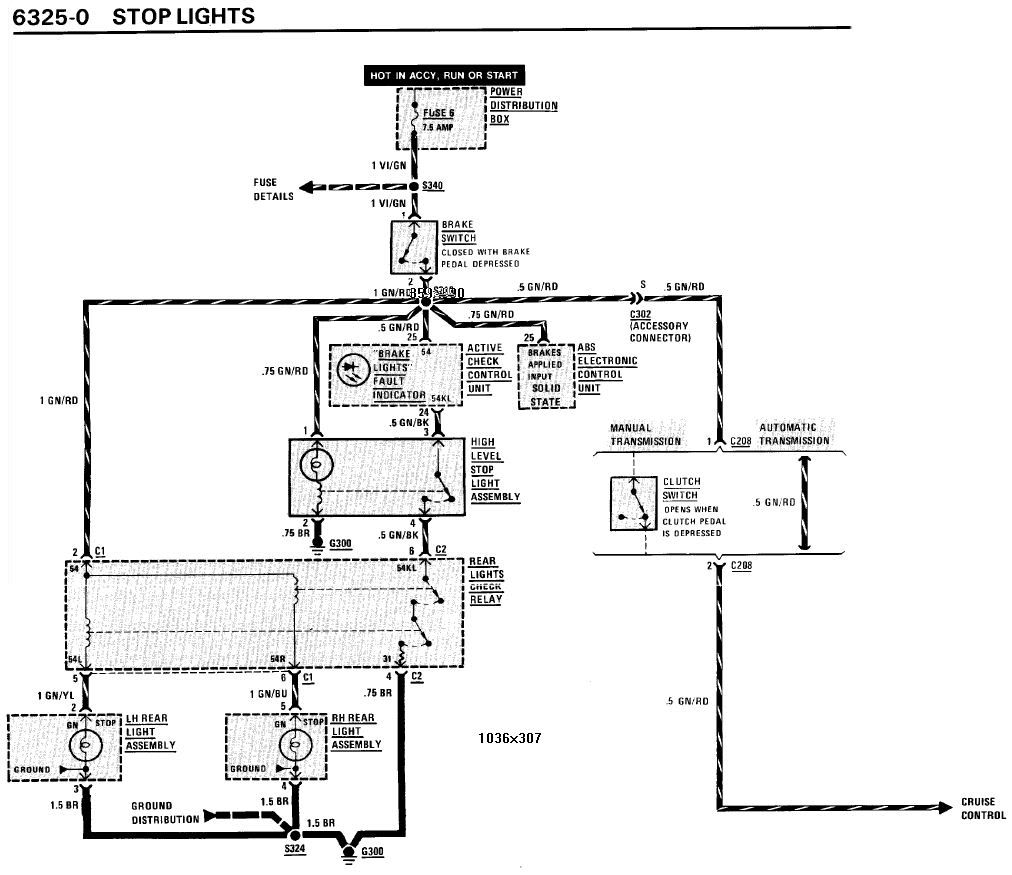
|
|
August 30, 2011 07:52PM
|
|
|
Registered: 15 years ago
Posts: 202 : Knoxville, TN |
Yeah, I jumped in and started melting solder before I noticed that difference. Luckily I figured it out before I got everything put back together, so I melted the solder on pin 24 too. Unfortunately, that didn't fix my brake warning light. Now I have to check the relays. All the bulbs and contacts are good. My box came apart differently than Ferd's. Some you will probably run into that too. My box had a back panel that had pins sticking through it that had the tops melted to make a rivet type connection. I had to pry the melted tops off the pins to get the box open. A couple of the pins broke off down inside the box in the process. To put it all back together I put super weather strip adhesive on the little pieces of the pins that were sticking out of the holes and some around the seam where the back joined the front of the box. I also used plenty of electrical tape to hold it in place while the glue dried. It was an interesting adventure, but it looks like I still have some work to do. John |
|
August 30, 2011 08:11PM
|
|
|
Admin
Registered: 15 years ago
Posts: 944 : Lake Havasu City, Arizona |
My brake light warning does come on randomly while driving but not often. I have checked the bulbs and polished the contacts. Even put dielectric grease on the bulbs to try and minimize the effect of corrosion on the current and it seemed to help. Only partially disassembled the check panel and ran out of daylight. Will take another look one day soon.
The oil level sensor had failed some how. not the first one either. This one checked good before I put it in but did not give me a good indication of oil level. The old one never indicated low even at the low level mark or even a little below. Maybe this one is doing its job as I was about half way down the space between the marks on the stick. I park on a slope in my driveway and that might make it worse. It started working correctly when I drove away from work. Parked level. May have to keep my oil level up better. I have a small leak and eventually it gets low between changes. Bob in Lake Havasu |
Sorry, only registered users may post in this forum.