Newbie starts Valve Spring replacement
Posted by Earendil
|
March 06, 2010 11:51PM
|
|
|
Registered: 15 years ago
Posts: 636 |
Stage one, ready the engine for removal of the head.
I had intended to do a little "How to", but since the Bentley describes how to get to the point of removing the head so well, this first part will be more like a picture book of my weekend 
Friday after work I headed out to the car. The sun was out, and it was a hot 55 degrees, and I had intended to just take some pictures... Before starting. [w3.gorge.net] Does that spring look like it's very springy? [w3.gorge.net] Misc view of the inside. [w3.gorge.net] A few "pictures" later and I had managed to drain the coolant and remove most of the hoses. As soon as the sun set, it wasn't so warm any more, and I headed home. [w3.gorge.net] Saturday! I had intended to just work up to the point where I got lost or needed a tool that wasn't in my carpenter tools inventory. I managed quite a bit... Here we are with the radiator out, as well as A/C Radiator out. Over the summer I had removed most of my rusted A/C system, knowing that I didn't ever want to pay to replace it, and it opens up the bay a lot more. [w3.gorge.net] Quite the view through the grill without those pesky radiators, aye? I'm starting to think a person could have removed the...doohicky the valves pivot on. I'll remember what it's called after I hit "post message" I'm sure. [w3.gorge.net] Removing the grill itself provides for a nice camera angle. Getting close to that timing belt! When I was attempting to line everything up, I remembered something I discovered the last time I did the timing belt, 3 years ago. That discovery was that my timing belt was installed one tooth off. Since my car had been running just fine, the collective that is BENN advised me to put the new one on the same way, which I did. I wonder if the collective will say something different now? I'll bring this up again during reassembly, I'm sure. [w3.gorge.net] Airbox and AFM out, and the engine compartment is starting to look a little slim. [w3.gorge.net] Just about everything is removed, just need to get those fuel hoses off. [w3.gorge.net] Ready for takeoff! Actually, still need to remove the head bolts... [w3.gorge.net] The head bolts came off without a hitch. For anyone else considering removing the head bolts, this was the only "gotcha". I had a 17mm wrench, but there was no room to use it. So I went with a 3/8 socket wrench, with its standard foot long arm. This would not have been enough (with my strength) so anyone else going to do this should have a breaker bar handy. I didn't have that (at least not in a 3/8), but I did have a highly sophisticated tool that I keep in my trunk, a broken handle off a branch cutter. Essentially a 3 foot metal pipe, but with a soft grip B) After removing the bolts in the Bentley specified order, and hearing squeaks and pings that sounded like bolt heads twisting off, I removed all the bolts without much trouble. At this point I really wanted to remove the head. I rocked it around to make sure it'd come loose, and it did. However I was working alone, and knew that, yes I could get the head out of the engine bay, but there was no way I was going to do it without causing sever damage to it and myself. So I covered it up for the evening, and am going to have to find someone to help me remove it. I also realized that even if I did remove it, I have no place to put it yet. The Bentley doesn't describe what to expect when the head is off, but pictures tell me that it isn't a smooth bottom, and that I need to have a table with a hole it it to place the head on. All in all I spent about 3 hours on saturday getting to the point where I could remove the head. It went a lot faster than I thought it would, especially since I was working alone. If you made it this far... you deserve a prize or something. How about answering/musing some questions instead? 
Most of the bolts I removed were very crisp and new looking, with a slight coating of clear grease. However 3 of the bolts were soaked up to their heads in dark engine oil. Is this cause for concern? If every bolt was equally hard to remove, how did oil get in there? I could only see an inch or so into the bolt holes, and couldn't see anything but air. I'm thinking of building a little wood platform out of two by fours that I can set on a regular table to raise the head up off the table. I can't find information on how deep this needs to be though. Any thoughts on the matter? I'd rather have it prepared and ready before I remove the head. Thanks for reading  ----------------------------------------------------------------------------------- 1989 - E30 - M20 - Manual. Approximately 270,000 miles 2000 - E46 - M52TUB28 - Manual. Approximately 110,000 miles 
|
|
March 07, 2010 04:57AM
|
|
|
Registered: 15 years ago
Posts: 670 |
You are talking about oily head bolts? It could be that during working off the bolts, the head loosened a bit and oil from the head drained and went into the bolt holes. On the platform: as the valves are above the lower surface of the head, use a soft material to put it on, such as wood. Doesn't look like there's a need to build something to raise the head to give the valves clearance. On the timing belt: I'd check everything and make sure it's put on correctly! Enjoy the work! |
|
March 07, 2010 09:05AM
|
|
|
Registered: 15 years ago
Posts: 1,538 |
Project is moving along smoothly B)
Two comments to make... 1. Put the T belt back on properly; BMW designed it that way so why tempt fate with a belt that is one tooth off and jumps one more? 2. When you put those new head bolts back in; make absolutely sure the bolt holes are not filled with oil. Any excess oil in the holes can lead to incorrect torquing 
|
|
March 07, 2010 12:40PM
|
|
|
Registered: 15 years ago
Posts: 636 |
Perhaps... It was the drivers side bolts, the very front and very rear bolts, in other words the first to be loosened. Probably makes no difference
Can you think of anything to keep an eye out for? Or just forget it and do as Peter says, make sure the holes are clean before putting the new bolts in?
Really? I guess this write up gave me impression that something drops below the level of the head. But maybe they were doing additional things that required that. I'm hoping I'll understand all of this when I can get the head off and see what the inside looks like. It's still a little bit of a blackbox to me. ----------------------------------------------------------------------------------- 1989 - E30 - M20 - Manual. Approximately 270,000 miles 2000 - E46 - M52TUB28 - Manual. Approximately 110,000 miles
|
|
March 07, 2010 12:53PM
|
|
|
Registered: 15 years ago
Posts: 636 |
Perhaps. So there is no wisdom in "If it aint broken, don't fix it" ?
I'll probably put it back. The timing belt being off a tick should be the LEAST of my concerns when I fire this engine back up.
Great advice. And this brings up a good point, what's a good cleaner for all the oil on the outside, and grime on the inside, that won't harm anything? Is this even a concern? That's right, I know very little about engines ----------------------------------------------------------------------------------- 1989 - E30 - M20 - Manual. Approximately 270,000 miles 2000 - E46 - M52TUB28 - Manual. Approximately 110,000 miles
|
|
March 07, 2010 01:07PM
|
|
|
Registered: 15 years ago
Posts: 670 |
|
March 07, 2010 01:12PM
|
|
|
Registered: 15 years ago
Posts: 670 |
Nothing bad should have happened to the block thread. Check the old head gasket for eventual leaks (not that I expect any there), clean out the holes as Peter said and torque the new head bolts as described in the Bentley.
It could be the valve is a little below the surface when fully open, you could check for that. If that's the case, you could also put some shorter bolts in the head bolt holes as a spacer (use some cardboard or rubber in between the bolt head and cylinder head surface). Then the head surface never has to touch anything. Prevent for head surface damage at any time, even the smallest scratch, as it will cause leakage. Curing that means shaving the head off. Edited 1 time(s). Last edit at 03/07/2010 01:14PM by Michiel 318iS. |
|
March 07, 2010 02:39PM
|
|
|
Registered: 15 years ago
Posts: 1,538 |
Just use Varsol or equivalent solvents to remove the build up. Sometimes the varnish looking discolouration just can't be removed without caustic materials and won't harm anything if it is left alone. I think that using a pressure washer with something like Simple Green would also do a good job. Just make sure to dry it off well and perhaps give it all a spray with WD40 to dissipate any moisture that's left and put a protecting seal on it while out of the car. As for the oil around those couple of head bolts; it could be the head gasket. The gasket has a special ring around the circumference of the cylinder walls that makes that seal tight but out where the bolts torque down, the gasket material can absorb oil and sometimes weep. This is a common problem on 4th generation Honda Civics and I've seen it on other engines as well. Needless to say, you will be putting a new head gasket on so there is nothing to worry about
|
|
March 07, 2010 04:06PM
|
|
|
Registered: 15 years ago
Posts: 202 : Knoxville, TN |
It looks like things are going real well. Tearing into an engine is fun, isn't it? What's really fun is starting it up after you get it all back together. You'll be there before you know it.
Add another vote for putting the timing belt back they way it was done at the factory. Fixing an engine is fun. Fixing an engine because you screwed something up is not so much fun, and that's exactly what might happen if you put the belt back off a tooth. I keep brake cleaner around for small cleanup jobs. It'll dissolve almost anything. Simple Green is good for big jobs. You could probably use the Simple Green to clean the head and brake cleaner to blast the oil out of the head bolt holes in the block. I'd follow the brake cleaner in the holes with a blast of air. You can use those computer duster cans (I know - it isn't air) if you don't have a compressor. Put a rag around the little tube or the air nozzle if you have a compressor before you blast the air so you don't get a face full of oil. Don't worry about some special hole in the workbench for the head to sit in. If you have some little blocks of wood you can use them to keep the head from resting on the valves that probably stick out when they're open. A variety of little wood scraps is always useful for holding things up on a workbench. |
|
March 08, 2010 07:54AM
|
|
|
Registered: 15 years ago
Posts: 797 : Ottawa |
There's another thing to watch out for because it can be awkward.
There is a pipe under the intake manifold that joins the intake manifold straight down into the oil pan. You can see it dead centre in this photo. 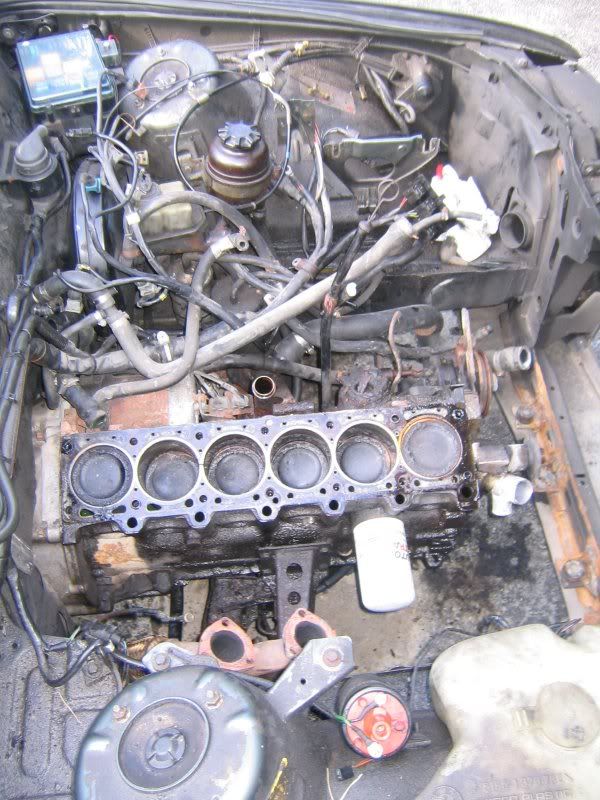
See also parts 9, 10, 11, & 12 in this realoem diagram When removing the head with the intake manifold attached, be sure to pull straight up to uncork the end of this pipe. The pipe has a rubber O-ring at the top and bottom ends to seal the connection. You should order replacements for those O-rings, as they can be a mysterious source for vacuum leaks. There should be a washer at each end, and a spring at the bottom end. When the pipe is all cleaned up it should slide smoothly up and down in the rubber O-rings with the spring keeping the pipe firmly seated up into the bottom of the intake manifold. Take note of the order in which the spring, washers, and O-rings fit. And put a bit of grease on the O-rings so the pipe slides in without damaging the new O-rings. It is a BITCH trying to get this pipe realigned into the hidden hole under the intake manifold when you are later trying to carefully set the heavy cylinder head with manifolds attached back into place. There is a trick though. When you re-insert the pipe with the spring, back into the hole in the oil pan, wrap the spring with a couple of zip ties to keep it fully compressed. Then seat the pipe as far as it goes down into the hole in the oilpan. Now it shouldn't touch the intake manifold at its upper end. After you have the head reseated properly, you can cut the zip ties and feed the pipe up into its proper spot, fitting it up into the bottom of the intake manifold. Piece of cake. When I was first told about that trick I was left scratching my head, what do you mean, this pipe actually moves? On my engine the bottom end of that pipe was so kacked up with dirt and rust and crap, I didn't even know that there was a spring at the bottom end of it. It cleaned up real nice though. Just make sure you're not dropping any dirt down into the oil pan when you pull the tube out. |
|
March 10, 2010 10:16PM
|
|
|
Registered: 15 years ago
Posts: 636 |
I got some help this evening and moved the head from my engine bay to the work bench. I'm hoping to have some time before the weekend to clean it up a bit and remove both the manifolds.
So far I'm hearing Varsol/Break cleaner/Simple green for the gunk on the outside. What about the carbon buildup on the inside? Should I attempt to clean the inside at all? I don't want to damage the seals with something that will melt them away. However I DO want to clean things up enough that I can check for cracks and other possible damage. Ferd, thanks for the advice on that pipe between the manifold and the oil pan. Unfortunately I completely forgot about it and lifted the head out without giving it a second thought. I didn't even think about it until we had the head on the work bench. Since it was already dark out (Car is outside) I didn't bother going back to check on the damage/missing pieces. Still missed at myself for forgetting. I'll report back in the next few days, probably with pictures. Cheers guys, and thanks for all the advice so far! ----------------------------------------------------------------------------------- 1989 - E30 - M20 - Manual. Approximately 270,000 miles 2000 - E46 - M52TUB28 - Manual. Approximately 110,000 miles
|
|
March 11, 2010 06:52AM
|
|
|
Registered: 15 years ago
Posts: 1,538 |
|
March 12, 2010 10:03AM
|
|
|
Registered: 15 years ago
Posts: 636 |
Okay, Round two (pictures pending).
I had intended (yet again) to just do a little bit of work, mostly cleaning. Ha! Two hours later and what was a single piece (Head + both manifolds + fuel rail + coolant attachment) was now in oily grimy pieces all over my bench. I removed both the rocker shafts and rocker arms. Only a slight bit of trouble here, hopefully no permanent damage done. There was enough buildup on the shaft that it didn't just "slide out" like all the writeups say. I had to use a dowel to knock it 3/4 the way out before I could use my hands to twist and pull the rest. The end of one of the rocker shafts is noticeable dented from the repeated impact. I'm somewhat concerned with what reinstalling them will entail. When removing the exhaust manifold there were two types of nuts: Easy to twist, and hardashell to twist. The 12 nuts were split about even in those two categories. 10 nuts in, only just breaking each loose, I figured out what the difference was. The easy to twist off ones were bring their studs with them!  I thought I was fracking over my head (no pun intended) but after some internet reading it looks like these are replaceable studs, and I wasn't actually breaking them off? What do I need in order to reattach them? Do I just screw them back in by hand, or use some sort of loc-tite product? I'll probably end up buying new studs to put in, as I doubt I'm getting these nuts off. I thought I was fracking over my head (no pun intended) but after some internet reading it looks like these are replaceable studs, and I wasn't actually breaking them off? What do I need in order to reattach them? Do I just screw them back in by hand, or use some sort of loc-tite product? I'll probably end up buying new studs to put in, as I doubt I'm getting these nuts off.
I also attempted to clean up the outside of the head and associated parts. Ran out of rags and shop towels before I got around to the intake manifold. Saturday morning I'll head back up and clean up the cylinders themselves and look for cracks. I'll also finish cleaning the head and check it for warping and cracks. Are there known trouble spots on the M20 that I should pay close attention to? After checking everything over and verifying my engine has a few more miles in her, I'll order the parts... or most of them. I'm already up near $500 worth, which doesn't count the $60 valve spring compressor I just ordered, or torque wrenches. It only covers the springs, gaskets, nuts, bolts, water pump, and timing stuff. I may have to wait for the next paycheck ----------------------------------------------------------------------------------- 1989 - E30 - M20 - Manual. Approximately 270,000 miles 2000 - E46 - M52TUB28 - Manual. Approximately 110,000 miles Edited 1 time(s). Last edit at 03/12/2010 10:03AM by Earendil. |
|
March 12, 2010 11:30AM
|
|
|
Registered: 15 years ago
Posts: 670 |
In order not to damage parts, when putting it down (like the cylinder head on your workbench) or when hitting it (your rocker shaft), use softer materials, so you don't damage it. A piece of wood, a nylon block, a copper hammer, they're all being used such that deformations will be taken by the wood/nylon/copper instead of the valuable part you're hitting.
If the stud threads are clean, I wouldn't bother replacing them, just tighten them back in, be happy you didn't snap any of 'em (or bolts on the end for that matter). It just means the block end of the stud was happier to turn than the nut end. |
|
March 12, 2010 01:32PM
|
|
|
Registered: 15 years ago
Posts: 636 |
I do like this idea. I started by using the long metal piece that is coated in rubber/plastic that comes as part of the E30 tool kit. Not sure what it's name is, but its used to line up wheels. Well it was strong, fit in the holes, and was coated in rubber at one end. I thought it was perfect and was using it until I realized I had broken away the hard rubber leaving a metal contact. This is what did the damage. I went looking for a wood dowel that would work, and almost made one, but gave up and used what one of the write-ups was using - a socket wrench extension. It actually worked quite well (a 3/8) and was just small enough to fit through the holes. Actually I believe I used a 10mm long socket which fit perfectly on the end of the rocker shaft. This worked on the second shaft without leaving a mark. I also used a soft rubber hammer the entire time, hoping for a slower acceleration of the metal. Not ideal, I know.
And I'm pretty sure the studs are clean, at least on the block side. The problem is that the other side has a nut rusted onto it, and I'm not sure how I'm going to get that off without trashing those nice threads. And for the record, one nut did twist a stud in half. Fortunately the stud broke right at the end of the nut. Makes me think it had sustained some damage in the past, as it wasn't all that hard to break. ----------------------------------------------------------------------------------- 1989 - E30 - M20 - Manual. Approximately 270,000 miles 2000 - E46 - M52TUB28 - Manual. Approximately 110,000 miles Edited 1 time(s). Last edit at 03/12/2010 01:33PM by Earendil. |
|
March 12, 2010 03:33PM
|
|
|
Registered: 15 years ago
Posts: 1,869 : Amagansett, New York |
I've been watching your progress and I must say, for a newbie you're doing well, of course the real test is yet to come so go slow and if you're in doubt about something ask first and make as little damage as you can (sounds like you're doing that anyway). Taking the head off was a good choice grasshopper
The exhaust studs are expendable so order a new set; if there are any with questionable threads (on the nut side) chuck em and start with a clean stud; you'll thank me later, when it counts. The new nuts (I usually get them from BAV) come with a crimped locking shoulder on one side of the nut, I run a tap through these and use lock washers and neversieze everything, on all hardware  everywhere. everywhere.
Look and see if you can come up with a brass drift/punch, they're great for getting shafts to move but try not to force things too much; cams especially, they're brittle and love to break. Did you pull the cam gear off to get at the seal? With the head off, run your fingernail up the wall and see what you have for a ridge (the top 1/8 inch of the cylinder wall), in fact, lower every piston the BDC and check the whole jug for scores and when the piston is at TDC see if you can move them sideways with all your fingers on the tops. If you plan on removing carbon use a dull blade and a soft touch. Rick |
|
March 14, 2010 01:08PM
|
|
|
Registered: 15 years ago
Posts: 636 |
Don't have time to do much besides post these pictures. I'll post again this evening.
Building a work bench. Carpentry! Something I know and have all the tools for
[w3.gorge.net] The slightly cleaner head [w3.gorge.net] [w3.gorge.net] [w3.gorge.net] Time to start on the cylinders. I've already started on the right most one. [w3.gorge.net] [w3.gorge.net] [w3.gorge.net] [w3.gorge.net] After cleaning [w3.gorge.net] [w3.gorge.net] [w3.gorge.net] [w3.gorge.net] [w3.gorge.net] I used a nylon bristle brush with a wood top, a small plastic scraper, and break cleaner. What do you think, should I attempt to clean them more? The tools I used are kind of at their limit ----------------------------------------------------------------------------------- 1989 - E30 - M20 - Manual. Approximately 270,000 miles 2000 - E46 - M52TUB28 - Manual. Approximately 110,000 miles
|
|
March 14, 2010 03:01PM
|
|
|
Registered: 15 years ago
Posts: 202 : Knoxville, TN |
It looks pretty clean to me. Rub a little motor oil on the cylinder walls if you got brake cleaner on them. You need to keep a little oil on them to prevent corrosion while they're exposed to moist air and it'll be good to have some oil on there when you start the engine. John |
|
March 16, 2010 02:40PM
|
|
|
Registered: 15 years ago
Posts: 636 |
Thanks for the kind words
The real test is yet to come, of course. Since I was born I've been good at taking things apart. My track record for putting them back together is slightly poorer 
Yep, I just ordered a set a few days ago from Pelican...Or maybe it was Bav. In any case, both places had a long lead time so I went ahead and just ordered them ahead of everything else.
Thanks for the tip!
If I'm thinking of the right gear (the one the timing belt rotates on) the answer is yes. However you have to remove it to get the rocker shafts out, so it didn't have much to do with the seals. I'm waiting for the "gasket head kit" to arrive, and see which gaskets are actually in the kit, since no vendor gives me a good answer...or at least one I understand
So, the inside of my cylinders has visible scoring, but not up and down the wall, at an angle. I suppose I'd describe it as if something "spiraled down the cylinder". However I can not feel the scoring with my baby soft fingers, and every cylinder has the same look. Thoughts? I can also move all the pistons side to side when at TDC, some more than others. However the movement is 1/4 mm to 3/4 mm. Do you think this is too much movement? I have more pictures, and I'll describe my last endeavors tonight at some point. Hopefully everyone here knows how much I appreciate the help. You are all quite amazing ----------------------------------------------------------------------------------- 1989 - E30 - M20 - Manual. Approximately 270,000 miles 2000 - E46 - M52TUB28 - Manual. Approximately 110,000 miles
|
|
March 16, 2010 02:41PM
|
|
|
Registered: 15 years ago
Posts: 636 |
Done! So if the block is aluminum, what are the pistons and rods made from? Is the inside of the cylinder aluminum as well, or some other metal insert? Just curious ----------------------------------------------------------------------------------- 1989 - E30 - M20 - Manual. Approximately 270,000 miles 2000 - E46 - M52TUB28 - Manual. Approximately 110,000 miles Edited 1 time(s). Last edit at 03/16/2010 02:42PM by Earendil. |
|
March 16, 2010 03:08PM
|
|
|
Registered: 15 years ago
Posts: 183 |
|
March 16, 2010 07:14PM
|
|
|
Registered: 15 years ago
Posts: 202 : Knoxville, TN |
What you're seeing on your cylinder walls is just exactly what you want to see. It is scoring and it was put there when the block was machined as a brand new engine (or at rebuild time, but I doubt that's been done yet). It looks like something spiraled up and down the cylinder wall because that's exactly how it was made. After the cylinder is bored to the correct size, it's honed to get that finish. Honing is done with a tool that has 2 or 3 blocks (usually, they can be made other ways too) of abrasive material that are spring loaded to push out against the cylinder walls. They're mounted on a motor (your drill if you're rebuilding an engine at home) and pushed up and down in the cylinder as the motor turns, leaving a spiral pattern on the cylinder walls. The grooves hold oil to lubricate the rings as they move up and down in the cylinders. It's really good to find them still visible. A smooth cylinder bore is a sure sign of an engine that's getting pretty worn out. I'll bet you don't have much of a ridge at the top either. That's what Rick was talking about - the highest spot the rings touch in the cylinder. An engine with a lot of wear will have a big ridge that you can easily catch a fingernail on. The pistons are probably fine since you have plenty of hatching (the scoring) in the cylinders. They're aluminum. The rods are steel. I'll have to admit, I'm not sure about the cylinders. It looks like they might be steel sleeves in the cast iron block when I look at pictures in the Bentley. Are you sure you're not a BMW service tech just playing with us geezers to see what we'll say? You seem to be doing better than the average beginner with only wood shop tools.
John |
|
March 17, 2010 06:47PM
|
|
|
Registered: 15 years ago
Posts: 1,869 : Amagansett, New York |
Hey Tyler, You're feeling for scores with your nail, not your fingers 
John's right about the honing marks, if they're cross hatch they are in fact a good thing to see but I'm sure you're just seeing them in the lower reach's of the jug, the top half I'm sure have been wiped out long ago. The fact that you can move the pistons a touch at TDC is fine (especially with your mileage), just as long as there are no long score (vertical ones) marks that would indicate a broken ring etc. You might consider testing the valve guides and putting in new seals too; if the guides are still somewhat tight the new seals will hold fine- I can run you through that process when the time comes. If however, the valves are rockin back and forth in their seats and when their at lift points the seals are a waste of time and guides will have to be attended to. The cleaning you're doing looks real good (It looks like you've been careful), excellent
Make sure those head bolt thread bores/threads are clean, dry and that the new headbolt screws in (all the way down) with no drag or fetching up. When you're installing the head coat the threads with a touch of light oil for a proper read on the torque wrench. Did you rent a spring compressor and have you started pulling the valve gear yet? Rick So far I give you high marks for your tenacity and general care/workmanship Keep it up, you'll be there in no time.
|
|
March 18, 2010 03:33PM
|
|
|
Registered: 15 years ago
Posts: 636 |
I did that too
Actually, I'm pretty sure that spiraling went way above half way. I'll check again and maybe take some pictures. I still have pictures from last weekend to post...
I'd love to do this. Could you describe how to "test" the valve guides? The Springs all come off in the next week, and I would guess that you want to test the valve guides after taking the springs off, and before putting the new set on. In fact i"m looking for things to do while I wait for parts (which will be ordered with tomorrows paycheck).
I guess I didn't mention this before, but what about the carved grooves in the top of the piston? There is certainly still carbon buildup in those grooves, which I assume are there for engineered flow dynamic reasons. Thoughts on making a special attempt at getting those cleaned out perfectly? I may try something a little hardly than plastic on them if I go in for a second round.
Will do with the head bolts. I bought a Spring compressor, not knowing that one could be rented. However in an area as small as mine, there may not be a place to rent one. It came during the week, and I haven't had a chance to back up to my car since. I do still need a couple torque wrenches though... Any opinion on something like this wrench? I'm looking for one that won't cost me an arm and a leg, but is accurate. What I don't need to pay for is long lasting durability. I'm not a mechanic, It's not going to get used tens of thousands of times before the end. Likely it'll get used a couple dozen times in its life. However I also need a second one to handle the larger values. So I'm looking at at least 2 wrenches, and don't really want to pay $100 per wrench right now. Is that my only option, or will something like this do?
Thanks ----------------------------------------------------------------------------------- 1989 - E30 - M20 - Manual. Approximately 270,000 miles 2000 - E46 - M52TUB28 - Manual. Approximately 110,000 miles
|
|
March 18, 2010 03:39PM
|
|
|
Registered: 15 years ago
Posts: 636 |
I didn't check for the ridge, I'll go back and do that this weekend. Or today is I decide that my lack of work really is worth leaving early...
You got me, I'm a service tech. I was hired by Peter to keep the forum on its toes, which is why we sometimes butt heads, to give the illusion that we aren't associated in any way
I may only have carpentry tools, but the person that owns them makes all the difference. My Father owns the carpentry tools, a Chemestry major who switched away from Philosophy when he decided to be a family practice doc. He did a significant amount of work on my childhood home, including all of the trim work. I get my desire to learn new things from him, which is why I went to school for Graphics design, came out with a Computer Science degree, and hang out with you guys on the weekends ----------------------------------------------------------------------------------- 1989 - E30 - M20 - Manual. Approximately 270,000 miles 2000 - E46 - M52TUB28 - Manual. Approximately 110,000 miles Edited 1 time(s). Last edit at 03/18/2010 03:40PM by Earendil. |
|
March 18, 2010 09:13PM
|
|
|
Registered: 15 years ago
Posts: 636 |
More Pictures!
A few from last weekend, and a few from tonight. Here we see what a normal and undamaged rocker shaft looks like when using a 9mm socket to pound it out with. [w3.gorge.net] And here we see what a BMW plastic covered tire tool does to it. Whoops... Thoughts on that dmg? It doesn't seem like it should have any ill effect what so ever, but perhaps I'm not thinking of something. [w3.gorge.net] Here are the bottoms of the intake rocker arms. Notice the worn section where one of the broken springs was obviously making contact with it. Exactly how weak are these wrocker arms to begin with? Should I replace it? Or call it a free rocker arm polish? [w3.gorge.net] Bottom of the cylinder head. I'm having major problems here. The head gasket left large chunks of its self on the head. I cannot scrub them off, I cannot melt them off with gas or other solvents. I finally gave up on the safe ways, and busted out one of those carpentry tools and skill sets, a BAMF chisel. Using its perfect edge I was able to shave off a lot of the gasket, but I didn't dare go all the way down to the aluminum. Any tips or tricks are very welcome here. Right now I'm trying to figure out which would be worse, to leave bits of gasket on there, or remove bits of aluminum head... [w3.gorge.net] Here you go, Rick! I told you those curved lines went all the way up
Now please tell me that what you see is still a good thing...Oh, and sorry about the crud on the side. Didn't realize I chose a dirty cylinder until after I got home with the pictures. There was also ZERO lip on the top of the cylinder. This was supposed to be a good thing, yes? [w3.gorge.net] Used my new tool to remove the first spring tonight. Out of all these pieces, guess which one the broken one is!! [w3.gorge.net] That valve looks okay, I think. [w3.gorge.net] Parting shot. Ouch... [w3.gorge.net] I got paid today, so I'm drawing up the parts list. I do have the girlfriend and another friend visiting for their Spring break (yes, I date them young), so we'll see how much I can get done. But if the parts get here mid week, I may have her up and running by the end of next weekend! Also, I heard from a guy that there is a place 20 minutes away that rents Torque wrenches. Dunno what they have, but they rent for $16 a week a piece. So may be worth it in my current circumstances. Thanks once again for following, as well as any comments! ----------------------------------------------------------------------------------- 1989 - E30 - M20 - Manual. Approximately 270,000 miles 2000 - E46 - M52TUB28 - Manual. Approximately 110,000 miles
|
|
March 18, 2010 09:25PM
|
|
|
Registered: 15 years ago
Posts: 636 |
A few questions on parts:
Right now the only parts I intend to replace inside the head, besides gaskets and springs, are the "Valve Stem Seals" I'm only replacing the spring seats (top and bottom) and the spring holder (valve collet) on the two valves with broken springs. See Real OEM for a reference picture. I've also just noticed that what I damaged on the rocker shaft might be number 5 in that diagram. Since PelicanParts has them for $1.75, I'm going to go ahead and get one and worry about whether I need it, or can even replace it, later
Cheers! ----------------------------------------------------------------------------------- 1989 - E30 - M20 - Manual. Approximately 270,000 miles 2000 - E46 - M52TUB28 - Manual. Approximately 110,000 miles
|
|
March 18, 2010 10:30PM
|
|
|
Registered: 15 years ago
Posts: 183 |
|
March 19, 2010 07:51AM
|
|
|
Registered: 15 years ago
Posts: 797 : Ottawa |
If you're buying the complete "Head Gasket Set", you might want to check, but when I bought mine it included a full set of Valve Stem Seals. That's them in the top middle of this photo. Also included are three re-useable yellow "condoms", that you slip over the top of the valve stem before pressing the new valve seal down the stem. Those prevent the sharp edges of the valve collet retaining grooves in the valve stem from tearing the new valve seals. Also included are the four D-shaped rubber plugs that fit into the cutout through which the rocker shafts slide out of the cylinder head. On my engine the original plugs had become hard as rock. I was amazed at how different the new rubber ones were. When pressed into their slots, they bulge up well above the surface of the cylinder head, lifting the valve cover gasket. You might want to put a little gasket sealer into that area to ensure a tight seal when the valve cover is pressed down onto the rubber plugs. 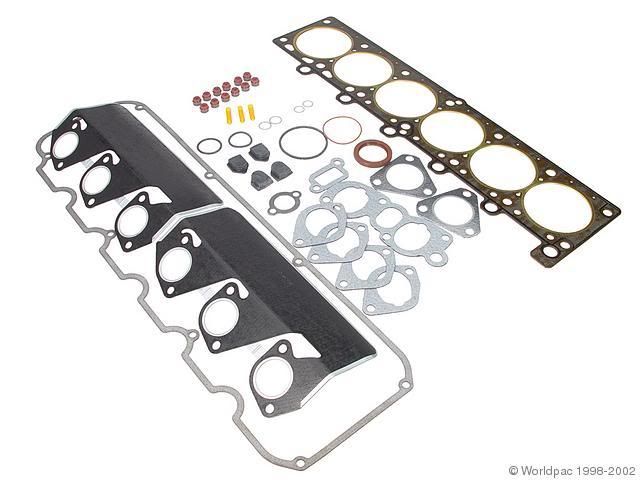
I'm sure you already know this, but just in case, you do have to use new head bolts. Do NOT re-use the old head bolts. The rocker shaft is a hollow tube with holes drilled into it so that oil can be pumped to each rocker pivot. Those number 5 plugs are there to cork each end of the hollow shaft. It looks like those plugs thread into the ends of the shaft. I have no idea how those are supposed to come out again since they have a flat face and there's no way to grab a hold of them to unscrew them. I'd be inclined to leave the mashed one in there, but just make sure you've cleaned off those little metal chips so no debris ends up in an important oil passage somewhere. |
|
March 19, 2010 09:55AM
|
|
|
Registered: 15 years ago
Posts: 636 |
I bought the Pelican head gasket kit. They don't define the contents, and when I asked they said it included "Every gasket you need from the head gasket up". Not very helpful for a noobie
I wouldn't have guessed that the valve stem seals would be part of the deal. Oh well, I payed $9 for the set, so at least I'm not sitting on a $50 part. I'll be honest, I'm not sure what exactly these condoms are for (laugh it up). Why include only 3 when there are 12 valves? Or are they not permanent fixtures, but are instead used for installation of the valve seals?
Funny you should mention those. I ran across that little item on a different forum, and thought to myself that it was a cheap part, and I should replace it. It was because I went to replace those 4 plugs that lead me to notice my busted outer valve spring. So I have 4 pretty new ones, but I'll be just fine with installing another set. I'm sure you already know this, but just in case, you do have to use new head bolts. Do NOT re-use the old head bolts. Yep
I have a new Torx head set coming, and I'm hoping that an E16 torx socket is what I need....because it's what I got! The rocker shaft is a hollow tube with holes drilled into it so that oil can be pumped to each rocker pivot. Those number 5 plugs are there to cork each end of the hollow shaft. It looks like those plugs thread into the ends of the shaft. I have no idea how those are supposed to come out again since they have a flat face and there's no way to grab a hold of them to unscrew them. I'd be inclined to leave the mashed one in there, but just make sure you've cleaned off those little metal chips so no debris ends up in an important oil passage somewhere.[/quote] That was kind of my feeling. The shaft isn't any shorter, because I didn't damage the edge. And It should still hold a seal, which I imagine is the only other function of the end. What is your gut instinct on looking at that polished/worn rocker? [w3.gorge.net] Nomis got the impression that I had already decided to replace it, but I haven't. My concern with "just replacing it" is that I'm slightly afraid that I wouldn't be able to slide a new rocker arm onto the shaft. Sure I was able to slide the old ones off past the buildup without too much trouble, but they are also worn a little. I would also guess that one would want equally weighted rockers, and I don't know how different brand rockers match up in the weight category. And of course, I don't really want to spend another $130 on rocker arms for the intake side ----------------------------------------------------------------------------------- 1989 - E30 - M20 - Manual. Approximately 270,000 miles 2000 - E46 - M52TUB28 - Manual. Approximately 110,000 miles
|

Sorry, only registered users may post in this forum.