I'm at a complete loss for words (Broken valve springs) 
Posted by Earendil
|
February 25, 2010 12:54PM
|
|
|
Registered: 15 years ago
Posts: 797 : Ottawa |
I've never actually tried this myself, so I'm no expert. But, there are a bunch of things you need to think carefully about beforehand: Here's a photo from the 2nd article that I posted a link to earlier. 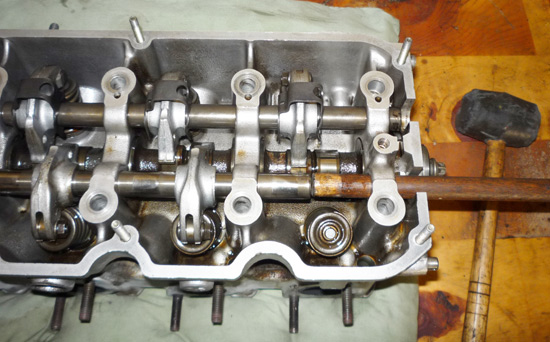
To use the spring compressor, you first have to expose the top of the valve, like the one shown at bottom right in the photo. To expose the top of the valve, you need to remove the rocker. To remove the rocker, you need to drive out the rocker shaft using a suitable dowel rod as shown. Driving out the rocker shaft is "relatively" simple when you have the cylinder head sitting out on a workbench as shown. But, where's the shaft going to go when the cylinder head is still sitting on the engine in the confines of the engine bay? You can't drive the rocker shaft back through the firewall. It has to come forward instead. You will have to remove the hood. Even then, have a good look at your engine and see whether the rocker shaft will clear the top of the upper radiator crossmember? Can you raise the engine high enough for the rocker shaft to come out the front? How are you going to drive the shaft out from behind the engine? There's not a lot of room back there to swing a hammer. Another crucial problem is that you need to turn and align the camshaft to release the spring pressure on the valves, as per the instructions in the links provided previously. But, you definitely don't want to be turning the camshaft alone, without simultaneously maintaining the proper alignment with the crankshaft. Otherwise you risk driving the valves into the piston tops. If you've already removed the timing belt and camshaft sprocket, as required to drive out the rocker shafts, then it becomes really difficult to maintain the proper alignment between the crank and camshaft if you're turning one but not the other. I don't mean to rain on your parade. Just want to be sure you're not rushing into this without some careful thought and planning. It's not as easy as it first sounds to do this with the cylinder head in place. Pulling the cylinder head off is really not that much more of a big deal. You can even cheat and leave the intake and exhaust manifolds attached, but you will need help lifting the head off as it's pretty heavy that way. I did mine that way when I had to replace the headgasket that was leaking oil. Here's what that adventure looked like. Don't be scared. It's fun! 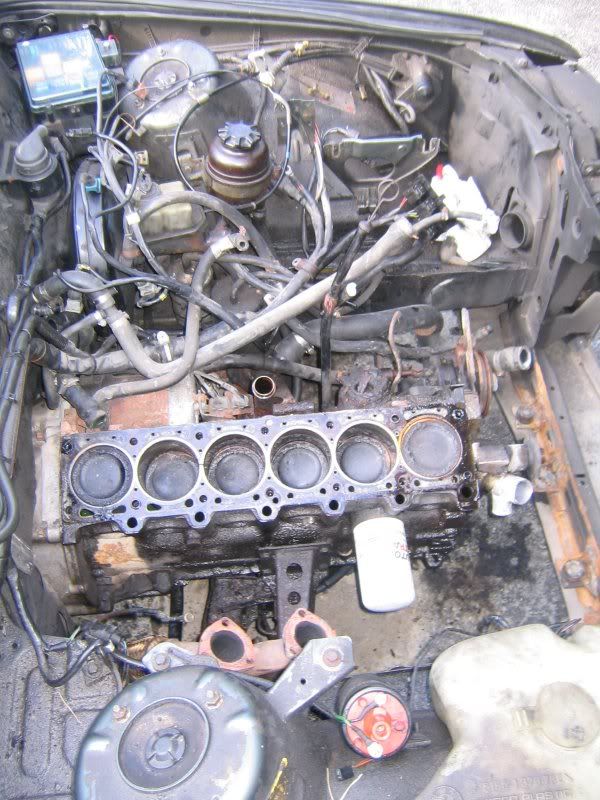
|
|
February 25, 2010 01:24PM
|
|
|
Registered: 15 years ago
Posts: 636 |
I really do appreciate that. It might have been the only thing I Noticed, but I did notice the removing of the rocker shaft. When I do my timing belt I always remove the hood. It's relatively simple compared to the pain my back feels after leaning over the side of the engine compartment 
Since the original post was made, I have not gotten back up to my car during daylight hours. The girlfriend has decided to come visit this weekend (woohoo!) but her idea of "quality time" with me doesn't involve watching me stain my hands black with oil and dirt. But hopefully we can get up there and I'll take my valve cover off, snap some high quality pictures of the inside, and of the engine compartment. If there is any interest in what I will call "valve rings", I'll post the pictures
I can then study the pictures alongside the tutorials that were posted, as well as the Bentley. Since my car is currently dead in the water, there isn't any rush to get this done. I'll take it all apart nice and slow, and look everything over before ordering parts. ----------------------------------------------------------------------------------- 1989 - E30 - M20 - Manual. Approximately 270,000 miles 2000 - E46 - M52TUB28 - Manual. Approximately 110,000 miles 
|
|
March 07, 2010 12:25PM
|
|
|
Registered: 15 years ago
Posts: 636 |
And The saga Continues....
Actually, it's more like a story about how I attempted to fix the valve springs to read when you're bored . Not really a saga per say... ----------------------------------------------------------------------------------- 1989 - E30 - M20 - Manual. Approximately 270,000 miles 2000 - E46 - M52TUB28 - Manual. Approximately 110,000 miles
|
|
March 07, 2010 05:16PM
|
|
|
Admin
Registered: 15 years ago
Posts: 944 : Lake Havasu City, Arizona |
Fatigue damage is cumulative. A piece of metal can be stressed to ultimate strength only once. At loads less than ultimate the number of load cycles before it breaks increases the further you are away from that ultimate...hence the need to define a fatigue limit. At the load that survives 10,000,000 cycles we call that the fatigue limit. However the number of load cycles at 6000 rpm is 50 times per second. At 3000 rpm it is only 25 times per second. The load at 3000 rpm is less than 6000 rpm but the cycles still contribute to the overall accumulated damage. Lets just assume that the load at 3000 rpm is one that would cause the part to fail at 100,000,000 cycles. So, all the time running at 3000 rpm gets added proportional to that rate and the higher loads at their rate. At some point the accumulated damage adds up to a failed part. Steel has a fairly distinct knee in the cycle vs. load curve but aluminum does not have as distinct fatigue limit. With aluminum, almost any load will eventually cause a failure.
Bob in Everett |

Sorry, only registered users may post in this forum.