new valves - anybody done it?
Posted by jh
|
February 10, 2009 10:52PM
|
|
|
Registered: 15 years ago
Posts: 6 : los angeles |
The timing belt went on my 85 325e. Wow. Since much of the cost is labor, been thinking of doing the new valves myself. I've been doing beginner stuff, plugs, idle air valve, filters etc, and a little work on the transmission. How over my head is this job? I'm planning on getting another E30 to drive around while I fix mine up, I think I'm an official enthusiast. Couldn't drive anything else.
Anyone else at my level done this job? Advice? thanks - jh |
|
February 10, 2009 11:42PM
|
|
|
Registered: 15 years ago
Posts: 78 |
It's quite a job if you have never done stuff like this, but even so, if you have a decent set of tools, are not intimidated by the idea and have a couple days you can do it. It can be done in a few hours once you've done it but I would guess it will take you a solid two days (maybe even a couple more). If you want, I have a good head that is complete with valves, springs, cam and rockers that I would let go cheap. It is important to make sure you didn't damage the pistons though. If the belt goes at high RPM the valves can do a lot of damage to the pistons (including punching a hole right through them), in which case you will need to completely rebuild the engine. Let me know if you want the head...
I am sure others will chime in soon. |
|
February 11, 2009 09:28AM
|
|
|
Registered: 15 years ago
Posts: 73 : San Diego, CA |
I've replaced the head on ours TWICE!!... The 1st head replacement was probably a bad head and didn't last the 1st year and it cracked... Maybe it was something we did.. I don't know.
It'll definitely take you a few days especially if you are doing this alone. We didn't mess with the valves since the head was cracked, but once the head is off, the valves can't be too bad to replace. There's always something that can kick your butt though. We had trouble getting the exhaust manifold back on. The studs didn't line up well. Another pain was getting the head on cleanly while lining up the damn oil return tube. Grrrr. Overall, the task seemed really daunting at first but wasn't that bad in the end.. You'll need Torx sockets for the head. |
|
February 11, 2009 10:19AM
|
|
|
Registered: 15 years ago
Posts: 797 : Ottawa |
Perfect. Then you won't be in a rush and can take your time to do it properly. If you don't already have a Bentley manual, get one of those before you do anything else. You won't regret it. It's the best investment you'll ever make in your car. With a broken timing belt, you'll have bent valves for certain, and possibly damaged pistons too. The cylinder head will have to come off either way, whether you plan to restore just the valves in your existing head or replace the entire head with a new one. I replaced a leaky head gasket on my 86 325, working in the driveway over one weekend. Following the steps outlined in the Bentley manual, it's all do-able provided you have some tools. |
|
February 11, 2009 10:47AM
|
|
|
Registered: 15 years ago
Posts: 6 : los angeles |
Thanks! I'm generally pretty handy, I do custom wiring for recording studios for a living, and build electronic things. My mechanic confirmed that some of the valves were bent, but we didn't talk about the pistons. The cover is off, what is the test for the pistons?
yours, jesse Edited 1 time(s). Last edit at 02/11/2009 10:48AM by jh. |
|
February 11, 2009 10:54AM
|
|
|
Registered: 15 years ago
Posts: 797 : Ottawa |
The nuts and studs holding my exhaust manifold were so rusty, I didn't dare touch them. And the intake manifold won't come off unless you first remove that pipe joining the manifold down to the crankcase (#11 in this RealOEM illustration). It wouldn't budge either, so I ended up pulling the cylinder head straight off with both the exhaust and intake manifolds still attached. It's a heavy bugger that way, and you'll need two people to lift it off like that. To remove or reinstall that vent pipe (#11), you force it down to seat into the crankcase against the spring (#12) so the pipe comes free at the upper end from the bottom of the intake manifold. Mine was so gunked up with crud, it wasn't obvious how it was supposed to be removed. Be sure to get two new O-rings (#9) for the top and bottom ends of that pipe, or else you risk having a vacuum leak later. It's a bit of a jig-saw puzzle when it comes time to reassemble the intake manifold to the head, because of that damn spring-loaded pipe. The trick is to fully compress the spring (#12) and hold it compressed using a plastic zip-tie around it, then seat the pipe down as far as it will go against the compressed spring into the crankcase. Now you have enough clearance to reattach the intake manifold to the head after it has been torqued onto the block. When you have the intake manifold in place, make sure you don't forget the washer and new O-Ring at the top of the pipe, and raise the pipe up to fit into the underside of the manifold. After it's all lined up and seated properly, cut the zip-tie that's keeping the spring compressed and thereafter the spring holds everything in place. That something for me was the coolant hose that plugs onto #15 at the very back end of the cylinder head. There's not a lot of clearance between the back of the engine and the firewall. I managed to get the hose connected but had a heck of time, struggling for a good hour, trying to figure out how to get the hose clamp back on. |
|
February 11, 2009 11:07AM
|
|
|
Registered: 15 years ago
Posts: 6 : los angeles |
|
February 11, 2009 11:12AM
|
|
|
Registered: 15 years ago
Posts: 1,538 |
One thing nobody has touched on yet is the level of valve job you want to or perhaps need to do. The simplest is to simply put new valves in and lap them to the seats. This is ok of the valve guides and seats are undamaged and in good condition. If there is seat damage and or guide wear, then the process becomes much more difficult and requires some specialty tools. Also, you can't ascertain the condition of the valves and the pistons by only removing the valve cover...the whole head has to come off before you can see the real damage. Since you can do all this at your leisure, it's probably going to be a relatively easy if not educational project. When you get into it; come back with pics of the damage and ant questions you might have. There are guys here who have been through the whole process 
|
|
February 11, 2009 12:07PM
|
|
|
Registered: 15 years ago
Posts: 797 : Ottawa |
Label all the hoses and electrical connectors, take photos, use various ziploc bags for any nuts and bolts you remove and label the bags, so you'll remember where everything goes when it's time to put it back together again. While taking the thing apart you'll think it's all obvious, and how could you possibly forget? But, trust me on this, if there's any kind of delay and you need to postpone the project for a week or two, after a couple of days or more you won't remember what goes where anymore and you'll end up scratching your head puzzled while looking at a bucket of leftover parts. 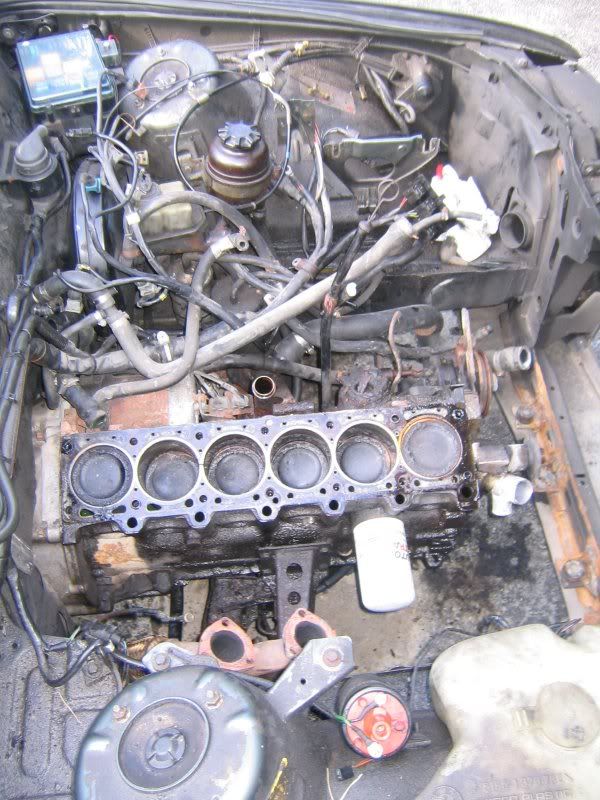
|
|
February 11, 2009 02:26PM
|
|
|
Registered: 15 years ago
Posts: 73 : San Diego, CA |
I don't recall why but we didn't remove the intake manifold from the engine compartment. I think a German auto mechanic from whom my dad bought the gasket set, told him not to remove the manifold completely. We detached a few things but basically lifted the intake manifold off the head and then pulled it back and held it retracted with a wire. I think it saves you time from detaching a lot of hoses,etc in the process.. That is probably why we had so much trouble keeping the oil return/breather lined up and retracted as our access to it was rather difficult.
Edited 1 time(s). Last edit at 02/11/2009 02:26PM by sdp. |
|
February 11, 2009 05:21PM
|
|
|
Registered: 15 years ago
Posts: 78 |
Hmm, my previous post seems not to have been sent correctly. If you would rather avoid the time and cost associated with new valves (ie. machine work, special tools) I have this head here that you could just bolt on in a day. It is off a 325es that ran great, had good compression and did not burn oil. I would let it go for $100 including the valves, springs, retainers, cam, rockers, cam gear, rocker shafts, etc. Everything needed to just bolt it on. If you would rather do this and save yourself some time and money just let me know.
|
|
February 11, 2009 07:48PM
|
|
|
Registered: 15 years ago
Posts: 1,869 : Amagansett, New York |
|
February 11, 2009 08:38PM
|
|
|
Registered: 15 years ago
Posts: 6 : los angeles |
|
February 11, 2009 08:58PM
|
|
|
Registered: 15 years ago
Posts: 78 |
At only 1500 I would say you're pistons are probably fine. Take a look, they may have some marks in them, but as long as they don't have holes or really deep gouges you'll be fine. I have seen some incredibly beat up pistons (from timing belt failure) in great running engines; you'd be surprised at how much beating they can take and still function with no sign of it. Obviously it isn't ideal to put it back together that way, but if you start replacing pistons then you are talking complete rebuild with new pistons, rings, bearing and machine work.
|
|
February 11, 2009 09:01PM
|
|
|
Registered: 15 years ago
Posts: 6 : los angeles |
|
February 11, 2009 09:24PM
|
|
|
Registered: 15 years ago
Posts: 78 |
|
February 12, 2009 06:37AM
|
|
|
Registered: 15 years ago
Posts: 797 : Ottawa |
|
February 12, 2009 11:20AM
|
|
|
Registered: 15 years ago
Posts: 1,869 : Amagansett, New York |
Yes, that's an extremely good deal. Too bad you're not around my neck of the woods; I have a 1987 (100k) car with a mint drive train for sale, its a stick too. I'm on the east end of long island new york. You'll be able to do a visual on the pistons once the head is off so get to it, I give you even money if they're still good. Cheers and good luck, Rick |
|
February 12, 2009 08:09PM
|
|
|
Registered: 15 years ago
Posts: 6 : los angeles |
|
February 13, 2009 12:22PM
|
|
|
Registered: 15 years ago
Posts: 1,869 : Amagansett, New York |
|
February 13, 2009 12:32PM
|
|
|
Registered: 15 years ago
Posts: 1,538 |

|
February 13, 2009 09:55PM
|
|
|
Registered: 15 years ago
Posts: 1,869 : Amagansett, New York |
Sorry, only registered users may post in this forum.